(scroll down for English)
Έχω μια εξομολόγηση να κάνω. Μαζεύω βαζάκια. Όλα τα βαζάκια καλά είναι. Μετά στρογγυλοκάθομαι στον υπολογιστή και ψάχνω στο Pinterest ιδέες για το πως θα τους ξαναδώσω ζωή.
Η σημερινή ιδέα κάθεται στον υπολογιστή μου καρτερικά για πολλά χρόνια τώρα, περιμένοντάς με να βρω τον χρόνο και την διάθεση για να την φτιάξω, παρόλο που από την πρώτη στιγμή βρήκα το ιδανικό σημείο για να το κρεμάσω – το εξοχικό των πεθερικών μου. Ελπίζω δημοσιεύοντάς το, να το φτιάξω επιτέλους.
ΥΛΙΚΑ
7 μικρά βαζάκια
7 κεριά ρεσώ
σύρμα
αλυσίδα
Γάντζος ασφαλείας (ορειβασίας)
Κομμάτια υφάσματος για διακόσμηση
ΟΔΗΓΙΕΣ
1. Ξεκινάμε κάνοντας την βάση για τον πολυέλαιο. Φτιάχνουμε ένα στεφάνι με το σύρμα, στριβωντάς το αρκετές φορές για να γίνει χοντρή η βάση και σταθερή. Στίβωντας το σύρμα, δημιουργούμε 7 θηλιές.
2. Κόβουμε 7 κομμάτια από την αλυσίδα στο επιθυμητό μήκος. Στερεώστε την αλυσίδα με σύρμα στη βάση του πολυελαίου, στο ίδιο σημείο που βρίσκεται και η θηλιά. Με αυτόν τον τρόπο, για γίνει ακόμα πιο σταθερός ο πολυέλαιος. Φτιάγνουμε ένα μικρό δαχτυλίδι με σύρμα για να κρατήσει όλες τις αλυσίδες μαζί και στη συνέχεια θα κρεμάσουμε τον γάτζο ασφαλείας από εκεί.
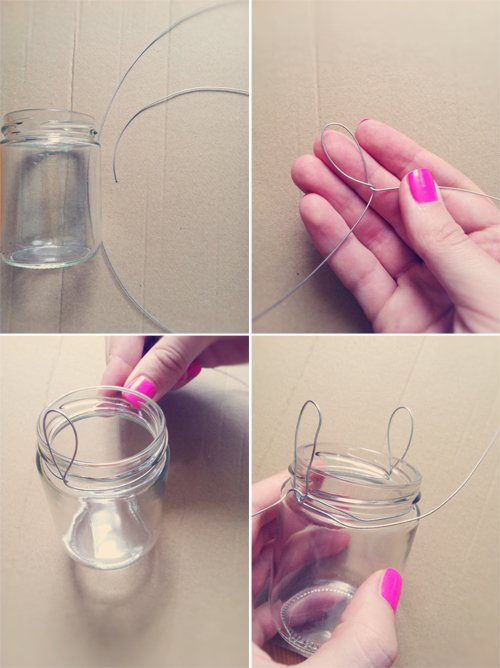
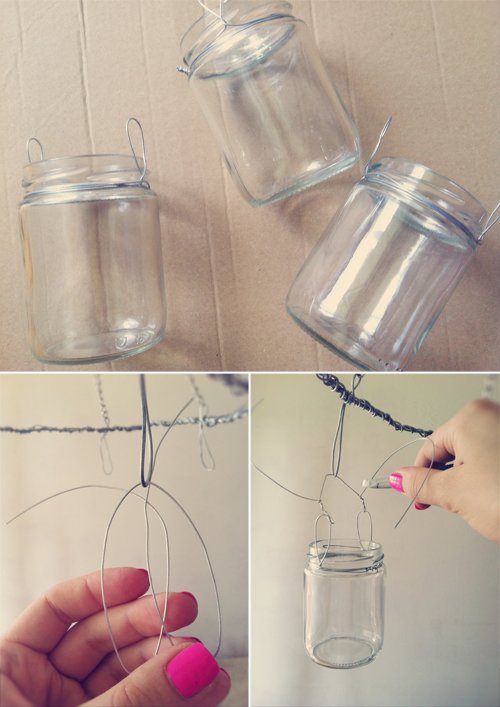
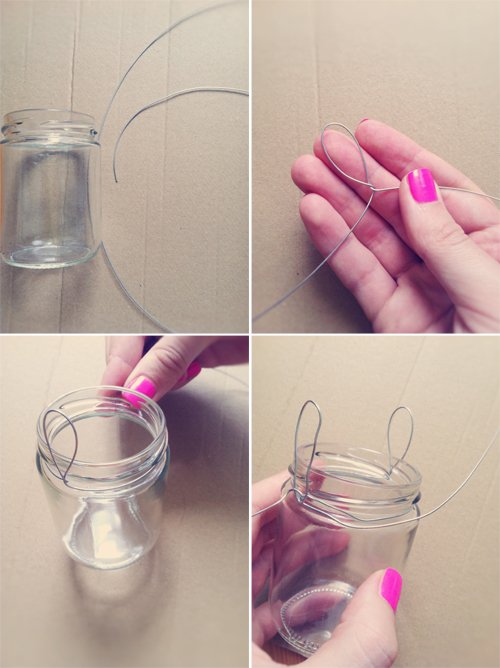
3. Φτιάχνουμε ένα στεφάνι με δύο θηλιές σε κάθε βάζο. Περνάμε ένα άλλο κομμάτι σύρμα από την θηλιά της βάσης και συνδέουμε τις δύο θηλιές. Κόβουμε όλα τα σύρματα που περισσεύουν.
4. Όταν ο πολυέλαιος είναι έτοιμος, βάζουμε ένα κερί σε κάθε βάζο.Μπορούμε να τον διακοσμήσουμε με κομμάτια υφάσματος.
I have an confession to make. I collect jars. Any jar. It doesn’t matter if it is a marmalade or mayo jar. I keep any kid of jar and then I search on Pinterest cool ways to repurpose them.
The following tutorial sits in my PC for some years now, waiting for me to find the time and mood to do it but I have already found the perfect spot for it – my parent’s in law beach house. I hope by posting it, I will finally do it.
MATERIALS
7 small jars
7 tealight candles
Wire
Chain
Spring hook
Textile for decoration
HOW TO MAKE
1. Start off by making the chandelier base. Use the wire to make a hoop. Twist the wire couple of times to make it thicker and more firm. Add 7 loops when twisting the wire.
2. Chop the chain at your preffered length. Make 7 pieces. Attach the chain to the base at the same place where the loops are. It will add stability to the chandelier. Make a small wire ring to gather all the chain ends together and then attach a spring hook to it. The spring hook will make it easier to hang the chandelier later.
3. Attach a wire with 2 loops to each jar. Then attach the jars to the base using a wire. Chop off all the excessive wire ends.
4. When the chandelier is ready, put a tealight candle in each jar. You can also decorate your chandelier using some textile.
Tutorial & Photos by Sausage Jar.

